
If you’ve ever heard that unmistakable squeal when pressing your brake pedal or noticed your car taking longer to stop, it’s probably time to learn how to replace brake pads. Though the task may sound intimidating, replacing your own brake pads is not only manageable for most vehicle owners but also incredibly rewarding. Not to mention, it can save you hundreds of dollars in labor costs. Whether you’re a DIY enthusiast or simply curious about the process, this guide will walk you through everything you need to know to take charge of your vehicle’s braking system.
Understanding Why Brake Pads Need Replacing
Brake pads are a crucial part of your car’s safety system. Every time you press the brake pedal, these pads press against the brake rotors to slow or stop your vehicle. Over time, this friction causes them to wear down, reducing their effectiveness. When brake pads become too thin, your stopping distance increases, and you risk damaging other parts of your braking system, such as the rotors or calipers. Recognizing when and how to replace brake pads can help prevent more expensive repairs and keep you safe on the road.
Signs Your Brake Pads Need Attention
Before diving into the actual replacement process, it’s important to understand the symptoms of worn-out brake pads. The most obvious indicator is a high-pitched squealing sound, which is typically built in as a wear warning. You might also feel a grinding sensation when braking, experience reduced responsiveness, or see the brake warning light illuminated on your dashboard. If your car pulls to one side when braking or if you hear a metallic screech, those could also be signs that it’s time to replace the brake pads. Being attentive to these signals ensures timely maintenance and preserves the integrity of your vehicle.
Preparation Is Key Before You Begin
Before getting started, make sure your vehicle is parked on a flat, stable surface with the parking brake engaged. Gather all necessary tools and materials, including a jack, jack stands, a lug wrench, a C-clamp, and, of course, the correct brake pads for your car model. While the process of how to replace brake pads is relatively straightforward, being well-prepared will make the job smoother and safer.
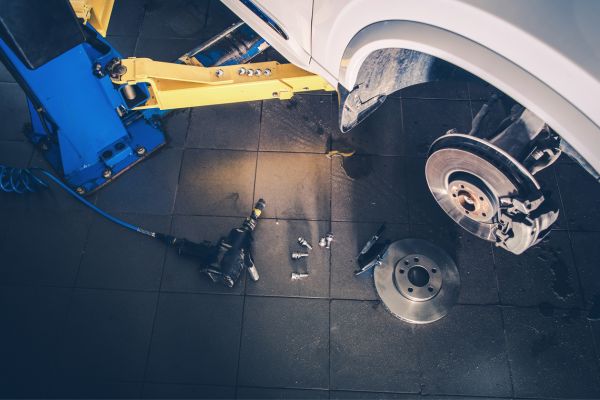
Removing the Old Brake Pads
Once you’re ready to start, begin by loosening the lug nuts on the wheel where you intend to replace the brake pads. After lifting the car and securing it with jack stands, remove the wheel to expose the brake components. You’ll see the brake caliper covering the pads and rotor. Carefully unbolt the caliper and slide it off, taking care not to let it hang by the brake hose. Use a bungee cord or place it on a secure surface.
With the caliper removed, the old brake pads should now be accessible. Slide them out carefully, noting their placement for easy installation of the new ones. Depending on wear, they might come out easily or need a bit of encouragement. Once removed, it’s a good time to inspect the rotor for any grooves or scoring, which might indicate the need for resurfacing or replacement.
Installing the New Brake Pads
Now comes the rewarding part of installing the new brake pads. Before inserting them, use a C-clamp to compress the caliper piston back into its housing. This step is crucial because the new pads are thicker, and the caliper needs to accommodate the additional width. Take care to do this slowly and evenly to avoid damaging the piston or brake fluid system.
Slide the new brake pads into place, ensuring they align correctly with the caliper bracket. Once secure, reposition the caliper over the new pads and bolt it back into place. Tighten the bolts to the manufacturer’s recommended torque to ensure everything is held securely.
Reassembling and Final Checks
After the new brake pads are installed, reattach the wheel and tighten the lug nuts by hand. Lower the car carefully, then use a torque wrench to fully tighten the lug nuts in a star pattern to ensure even pressure. With the car back on the ground, pump the brake pedal a few times to seat the new pads properly. This step is essential because the caliper piston was compressed during installation, and the brake pedal may initially feel soft until the pads are fully seated.
Take a short, slow drive around your neighborhood to test the brakes and ensure everything feels and sounds right. It’s normal to hear slight noise as the new pads bed into the rotors, but any grinding or squealing indicates something may be off and warrants a second look.
Benefits of Replacing Your Own Brake Pads
Learning how to replace brake pads empowers you to maintain your vehicle proactively while gaining a deeper understanding of its mechanics. It’s a satisfying experience that combines hands-on skill with practical savings. You avoid the markup costs of a professional mechanic and get the assurance that the job was done with care.
Moreover, performing this task yourself builds confidence for other maintenance jobs in the future. Whether it’s changing your oil, replacing an air filter, or checking fluid levels, this foundational skill sets you on the path to becoming a more self-sufficient vehicle owner.
When to Seek Professional Help
Although replacing brake pads is accessible to many, it’s not for everyone. If your vehicle has a complex braking system, like regenerative brakes or electronic parking brakes, or if you’re unsure about any part of the process, it’s best to consult a professional. Your safety is paramount, and when in doubt, seeking expert help is the smartest move.
Additionally, if you discover uneven wear, leaking brake fluid, or damaged rotors, these may require advanced tools or professional inspection. Taking on a task beyond your comfort level could lead to mistakes that compromise your car’s performance and your safety.
Closing Thoughts
Mastering how to replace brake pads is a valuable skill that not only saves money but also enhances your understanding of automotive care. By following the proper steps, paying attention to signs of wear, and taking safety precautions seriously, you can maintain your braking system with confidence. Whether you’re driven by necessity or a passion for DIY maintenance, this task stands as one of the most approachable and impactful ways to take control of your vehicle’s health. So next time your brakes start to squeal, you’ll know exactly what to do—and more importantly, how to do it right.