
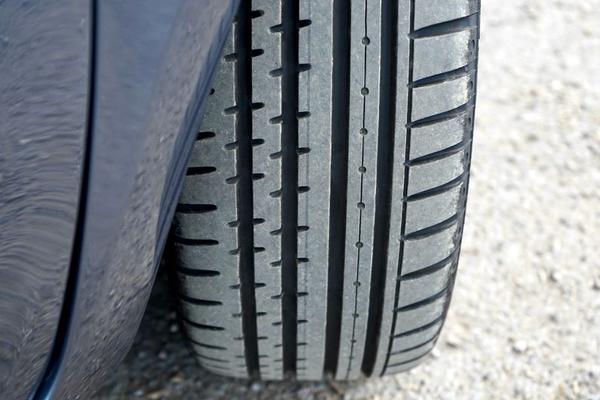
A tyre can look perfectly serviceable from a few steps away yet have one badly worn strip hidden near its inner edge. Checking tread depth at home means more than glancing at the rubber or measuring one convenient groove. A few minutes with a gauge, or a 20p coin for an initial check, can reveal wear before it becomes a surprise at the MOT or on a wet journey.
This practical guide explains where to measure tyre tread, how to compare readings and what to do when one area wears faster than another. It covers ordinary UK car tyres.
Get ready for a reliable check
Park on firm, level ground, apply the parking brake and switch off the engine. Use daylight or a torch to see into the main grooves. Brush away loose grit before checking. Never reach underneath the vehicle or inspect a wheel while exposed to moving traffic.
An inexpensive tyre tread gauge, digital or mechanical, gives readings in millimetres. A 20p coin offers a useful quick screen but no exact measurement. Note your results for each tyre: front left, front right, rear left and rear right. Comparing these records monthly helps you spot changes.
Where exactly should you measure?
Look for the main, continuous grooves running around the tyre. These primary grooves are the right places for a depth gauge. Tiny decorative cuts between tread blocks, often called sipes, are not measurement points. Avoid raised tread wear indicators too.
Check several grooves across the tread, including positions towards each side of the central running area. Repeat at several points around the circumference. Three places around each tyre are a useful starting point; check more if readings vary. If necessary, move the car a short distance safely to expose a hidden section. The visible patch does not represent the whole tyre.
For UK cars, the legal minimum is 1.6mm in primary grooves across the central three-quarters of the tread width and around the full circumference. Our guide to UK legal tyre tread depth explains the rule further. A tyre can still require attention because of damage or abnormal wear even above the minimum.
How to use a tyre tread gauge
Take an accurate reading
Set the gauge to zero according to its instructions. Rest its base flat against the tread blocks beside a main groove, then lower the probe to the groove’s bottom. Keep the gauge upright and read the depth. If the probe hits a raised wear bar, move slightly along the groove and try again.
Repeat in other primary grooves and several locations around the tyre. Record the lowest reliable measurement and any differences. A single 4.5mm reading tells you little about an inner groove that may be much shallower.
What different readings reveal
Imagine the front-left tyre measures 4.2mm in an outer primary groove, 3.8mm near the middle and 2.3mm in an inner primary groove. Describing that tyre as having 4mm of tread would hide the important detail. Uneven wear warrants a professional check of the tyre, pressures and possibly wheel alignment or suspension. Measurements alone cannot establish the cause.
How the 20p tyre test works
Without a gauge, insert the edge of a clean 20p coin into a main tread groove. Look at the coin’s outer band. If the tread hides that band, it is a reassuring sign. If the band remains visible, TyreSafe advises having the tyre checked immediately by a qualified professional.
Repeat the 20p tyre test in multiple grooves and positions on every tyre. Hold the coin consistently instead of tilting it to hide the rim. This is a screening check, not a precise millimetre measurement; it can also miss localised wear. Use a gauge or ask a tyre fitter if the result looks borderline.
What tread wear indicators tell you
Many car tyres have small raised bars moulded into their primary grooves. Markings on the sidewall may show where to find them. As the tread wears, it approaches these bars. When the tread is level with the bars, it is at approximately the legal minimum and needs replacement.
These indicators are visual warnings, not a full inspection. They do not show how much tread remains elsewhere. Check tyre wear across the width, including less visible inner areas.
Read the wear pattern, not just the number
Similar readings across comparable grooves usually suggest more even wear. A shallow centre can be associated with overinflation, while wear on both shoulders can suggest underinflation. One-sided wear may indicate alignment or suspension issues. Patchy dips can also have mechanical causes.
These are clues, not diagnoses: loading, driving habits and tyre design affect wear too. If one area is wearing much faster, arrange an inspection. Our guide to checking car tyre pressures explains how to find and measure the manufacturer’s recommended pressures.
While examining each wheel, look for cuts, exposed cords, bulges, cracking and embedded objects. Do not remove an embedded nail or screw yourself; a specialist can assess the tyre. A bulge or exposed cords needs urgent professional attention regardless of tread depth.
When should you check again?
Make tread inspection part of a monthly tyre check and repeat before long journeys. Check more closely before extensive wet-weather driving. If the lowest reading approaches 1.6mm, seek professional advice instead of using the legal minimum as a wear target. Wet-road performance can deteriorate before the tyre becomes illegal.
A recent MOT pass does not guarantee today’s tyres are sound. Wear and damage can occur between tests. Our guide to car tyre safety checks covers condition and inflation alongside tread.
Frequently asked questions
Can I check tread depth without a gauge?
Yes. A 20p coin offers a quick indication, and wear indicators provide a visual warning. Neither is as precise as a depth gauge, so obtain a proper measurement if uncertain.
Do I measure every groove?
Measure several primary grooves across the main tread, rather than every tiny cut or sipe. Check multiple places around the tyre too, particularly anywhere that looks worn.
Is one low reading enough to worry about?
Yes, once you have repeated it correctly. Localised wear matters even when other grooves appear healthy. A professional can confirm the depth and inspect the full tyre.
How often should I check my tyres?
Monthly and before a long trip is a practical routine. Check sooner if you notice pulling, vibration, unusual handling or visible damage. Those symptoms need more than a tread measurement.
Make every measurement count
Knowing how to check tyre tread depth at home is about being systematic: use primary grooves, compare across each tyre and check around its circumference. A gauge gives the number; the pattern helps identify what needs investigating. If measurements vary sharply, the coin test is borderline or damage is visible, have the tyre assessed before your next journey.